


Anatomy of a Bird: Anatomy of a Bird: Making a Turducken
Originally published in Beeradvocate magazine, Issue #22, you can find the recipe for this wonderful dish here. Here are the step by step directions on how to de-bone a turkey, duck and any other poultry or fowl. If you are looking for the recipes, check out Turducken.
Before beginning the task of deboning, let’s cover a few basics.
Preparation will make this task easier. By this I mean, clean your work area ahead of time. Wash and clean everything very well. A turducken cooks like a great bar b-que, low and slow. But with that slowness, any contact from not washing your hands, equipment and anything else that will come in touch with the meat can cause food contamination issues. Do to the low cooking temperature and lengthy time in the danger zone for food borne illness to propagate. With cleanliness, these issues correctly addressed, the possibilities for these problems are greatly reduces, if not eliminated. Use hot soapy water on your knife, cutting board, sheet pans and your hands. Additionally, prepare all the stuffing’s in advanced and make sure that they are chilled properly.
Next rinse all the poultry in cold water, rinsing the inside and outside of each bird. Pat dry and keep each bird refrigerated till ready to use. Only have one bird out at a time, unless someone is helping you with the de-boning task. I once learned the 5 P’s from a teacher: Proper Preparation Prevents Poor Performance. I think this philosophy works great as a protocol in the kitchen, even though he was teaching Sex Ed.
Start with the turkey. Placing breast side down, and the spine facing you. Using the tip of your sharpened and honed de-boning knife, cut through the skin down the middle of the spine, starting at the neck and finishing at the tailbone. Once made, this will be your reference cut. Again using the tip of the knife, start by tilting the blade to the right, keeping the edge of the knife somewhat parallel with the spine and rib bones. Cutting under the skin of the reference cut, slice down from the neck of the left side of the bird. Cut as close to the bone as possible, making slow and thoughtful slices in a smooth motion. Repeat, re-angling the blade with each cut.
As you get further into the breast meat, the wing joint will show itself. If needed, using your free hand, hold onto the wing, and use it as a handle to work around the joint. Find the tendons and sever them. Continue working down to the thigh and its joint with the back. This area is called the oyster. There is a dimple of meat around the hip area. Try to save this meat by cutting in a circle where this joint connects with the spine. Hold onto the leg/thigh with your free hand and move the leg to expose the joint and area and cut. Once the joint it exposed, cut the two tendons, one on top and one underneath the thigh bone. Continue removing the meat from the chest cavity will you reach the breast bone.

Repeat the same procedures, but tilt the blade of the knife to the left, removing the meat to the right of the spine. The same anatomy will show itself as the procedure continues. Once all the meat is de-boned from the turkey carcass, hold the spine with your free hand and placing the blade parallel with the cutting surface, start at the base of the neck and cut down to remove the meat from the crest of the breast bone. Be careful not to cut through the meat or skin, as the goal with this whole procedure is to finish with a large rectangle of meat, all in one piece. Check the carcass for any missed meat and remove it, before setting your bones aside on a bowl. An extra benefit of making a turducken is you get three different types of bones, all perfect for a rich homemade stock, that will become the gravy of the gods.
Now that the carcass has been removed, it’s time to revisit the wings. In order to have the finished turducken look as like the original turkey as possible, only debone the drumette of the wing, keeping the tip and secondary drumette whole. Start at the exposed wing joint, where it originally connected to the spine and cut the underneath side of the drumettes to the secondary drumettes. Starting on one side, using the tip of your knife, cut around the bone, removing the meat in one piece, as you did with each side of the whole bird. Repeat on the opposite side. Once the bone is fully exposed to the second joint, remove the bone, adding it to the other stock bones. Repeat the process with the second wing. Double check that the cartilage from the joints that attach to the bone are removed.
Take the same idea with the wings and apply this to each thigh. Since the drumettes had a lot of thick tendons and they are difficult to remove, I leave the drumettes whole, only de-boning the thigh portion. Again, the idea is to have as much surface area of meat, all the same thickness, creating a large rectangle. Slice down the thigh, starting at the exposed joint and proceed to the drumette joint. Add these bones to the stock pile as well.
Now, the hard part has been done. The next step will help create an even layer of meat, for when the final slice of cooked turducken is placed on serving plate or tray. Butter flying the meat, and creating an even thickness of meat, helps the bird not only cook more even, but helps in the final look of the turkey. To do this, find the thickest part of the breast. Cutting parallel with the cutting board, cut into the middle of the breast using the tip of the blade as a reference to how deep the cut is. Do not cut all the way through the meat. Cut about two/thirds of the way through and then open up the cut by folding the flap of meat back. Repeat this same cut on the opposite breast. Repeat this technique on the thighs and any other area that has a high spot of thicker meat.
Once finished, season the meat with salt and pepper, setting on a sheet pan, wrap with plastic wrap and re-clean every surface and knife with hot soapy water.
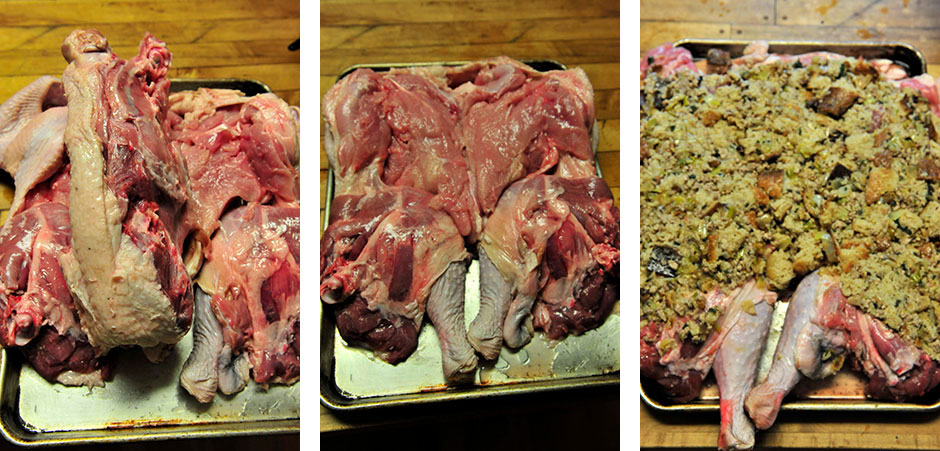
Now it is time for the duck. The anatomy of the duck is very similar to the turkey, only differing in the thickness of the duck breast in relationship to the rest of the bird. The breasts are longer and thinner. Follow the same techniques above for the duck. The only thing that will differ from de-boning the turkey is that you will need to remove all the bones in the duck and pheasant or chicken. This includes the wing drumettes and leg drumettes. Since this and the third bird will not be seen and are acting like stuffing, these bones will affect the carving of the finished turducken. Save these bones for stock.
Once finished, season again with salt and pepper, placing on a new sheet pan. Repeat this procedure to the last bird of choice. Remember to re-clean everything before beginning. If a rest is needed, after a bird is finished and surfaces cleaned is a good time to do so.
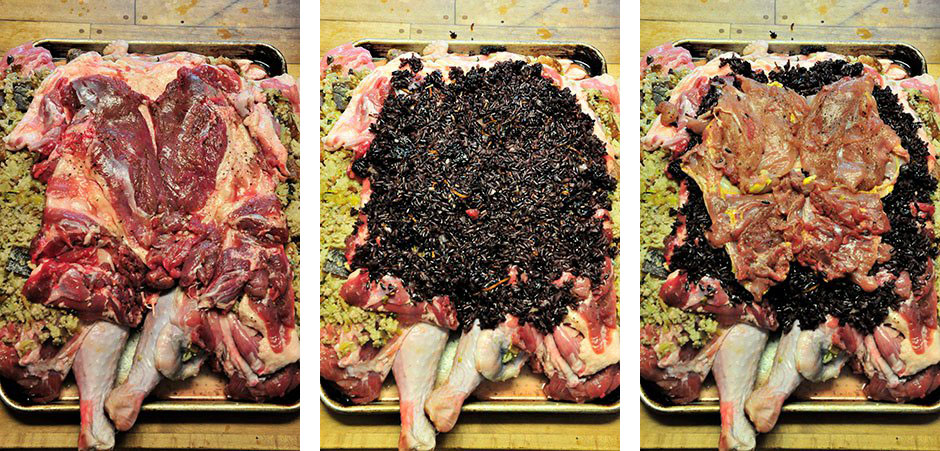
To fill and form the turducken, start with the turkey skin side down and arranged so that the breast meat is on top and the thigh meat is closest to you. Season the meat with salt and pepper if you have not done so previously, then dot the entire surface with ¼ cup of butter. Cover the turkey with a one-inch thick layer of the Pork and Caramelized Leek Stuffing, leaving a ½ inch boarder at the edge of the meat. Next lay the de-boned duck atop the stuffing, in the same orientation as the turkey. Season with salt and pepper (if not done previously) and dot the surface with ¼ cup of butter. Top the duck with a one-inch layer of Purple Rice and Dried Cherry Stuffing, again leaving a ½ inch boarder around the meat. Finally, place the pheasant centered on the duck and turkey. Season as before and dot with remaining butter. Add a layer of Ciabatta Stuffing with Mixed Fresh Herbs and Deschutes ESB, again leaving a border.
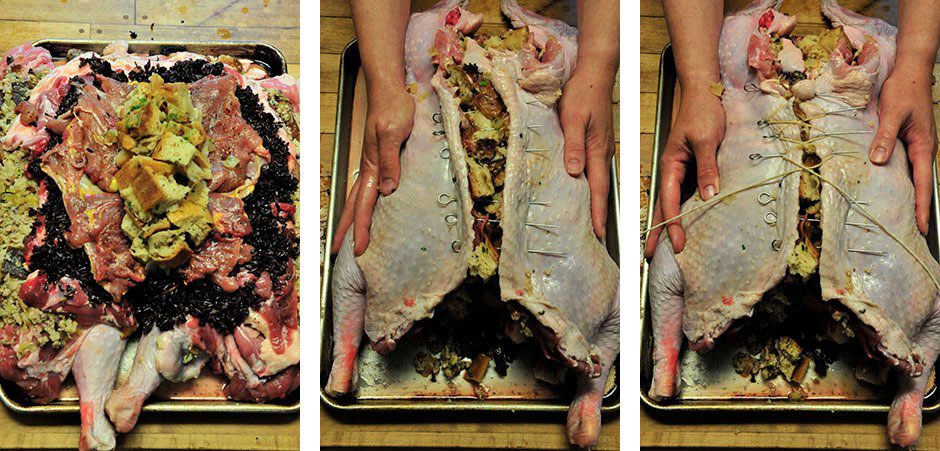
This is where a second set of hands will become very handy! Slide one hand under the left and the other hand under the right side of the turkey, bringing the turkey back together. The second person can help curl the meat together, keeping each layer from falling apart. Next, along the spine cut of the turkey, place metal or wooden toothpick size skewers every inch or so, piercing each side of the meat, about one inch from the cut. Now, using a long piece of kitchen twine, weave between the skewers like shoelaces, pulling the skin together and sealing the bird, and tie it off. Carefully roll over the turducken onto its back. Using both sets of hands, carefully place the stuffed turkey onto a roasting rack in a roasting pan. Mold the stuffed turkey to look as much like a regular turkey as possible, by folding the wings underneath breasts and cross the legs. Rub the skin with butter and season with salt, pepper and sprinkle any leftover herbs from the stuffing’s.
Preheat the oven to 225°F | 107°C. Place the turducken in the center of the oven on convention roast (if available). Insert a thermometer probe into the very center of the stuffing. Plug into a thermometer/timer and set the temperature to 165°F | 74°C. The turducken will cook between 8 – 10 hours depending on how accurate the oven is and the combined size of the birds. Remove from the oven and let rest for 30 – 45 minutes before serving. Cover with aluminum foil as it rests to keep warm. Save drippings to make a roux for a gravy base.
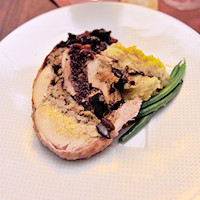
To carve, since all the bones have been removed, cut across the breasts, as you would roast. Serve a slice to each guest.
