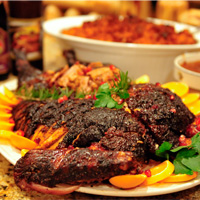
This Beer Brined Turkey recipe teaches you how to create a juicy, moist, and wonderful flavored turkey that will make your guests want to take all the leftovers home.
| Servings | Prep Time |
| 16guests | 30minutes |
| Cook Time | Passive Time |
| 3 1/2hours | 2 – 3days |
|
|
Ingredients
Beer Brine Ingredients:
- 1quart waterfiltered
- 2cup salt, kosherdo not use iodized salt
- 1cup sugar, light brown
- 1tablespoon peppercorns, blackwhole
- 4each bay leavespreferably fresh
- 3bunch thyme, fresh
- 3each onions, yellowpeeled and chopped
- 3stalks celerychopped
- 3each carrots, largepeeled and chopped
- 6each garlic, clovespeeled
- 1each lemoncut into slices
- 1each orangecut into slices
- 6pound iceor 3 quarts ice cold water
- 1gallon beer, ice coldsuch as American Brown Ale, Märzen | Oktoberfest, Bock or Scotch Ale | Wee Heavy, see note below on cooking beer suggestions
Turkey Ingredients:
- 16 – 24pound turkeypreferably free range, organic or heritage
- 1bunch sage, fresh
Instructions
Beer Brine Directions:
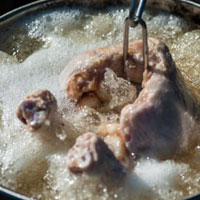
- At least 2 days in advance of Thanksgiving | event | Holiday, start the brine. In a large pot, over high heat, add the water, salt, sugar, peppercorns, bay leaves, thyme, onions, celery, carrots, garlic, lemon, and orange. Bring the liquid to a boil and simmer for 10 minutes to infuse the flavors together, dissolving the salt and sugar. Turn off the heat and let the brine cool for 20 minutes, then add in the ice and beer of choice. Mix the ingredients together and take the temperature of the finished brine. A thermometer should read 40°F | 4°C or lower in order to be safe to use. If it is warmer, place the pot into a refrigerator/kegerator until 40°F | 4°C is reached.
Turkey Preparation:
- Take the fresh turkey and remove it from its package in a large sink. Remove the neck, gizzards and liver, setting aside (for stock or gravy). Rinse the bird under cold water, turning the bird over a few times, washing any blood from the cavity and under the neck flap. Remove any remaining quills from the skin, if visible. Remove any excess fat from around the inside cavity. Turn off the water and lightly dry the turkey off with paper towels.
Using the Beer Brine Directions:
- For brining, have ready a Cambro 22 qt Polypropylene Food Storage Container
, large stock/brew pot, a brining bag or Ziploc XL HD Big Bag
. Place the turkey into the container of choice, then top off with the chilled brine, submerging the turkey completely. Then place in the cold storage, for example a refrigerator or kegerator.
- If cold space is an issue, use a large cooler and sanitize it with a bleach-water solution (1 tablespoon of bleach per gallon of water or 200ppm) or Star San (1 ounce of StarSan per 2 gallons of water).
- Place the cooled beer brine into the now clean cooler and add the turkey. Use several gallon size seal-able bags fill with ice, to keep the bird and brine ice cold, but not diluting the salinity or flavor of the brine. This will also work if you are beer brining multiple turkeys at once and have doubled or tripled the beer brine recipe to fill the cooler size you are using.
- If you are using a Ziploc XL HD Big Bag
- Beer brine the turkey for at least 24 (for a smaller bird 16 pound) to 48 hours (for a larger 22+ pound bird). Keep the turkey and brine cold during this marinating process. Every 12 hours, rotate/flip the turkey in the brine to evenly marinate it.
Preparing the Finished Beer Brined Turkey for Cooking:
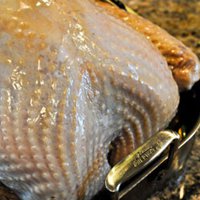
- Remove the turkey from the brine and dry well with paper towels, both inside and out. Repeat this several times, to get as much of the moisture removed. This will help the browning of the skin, as moisture will steam the skin instead of roast it. Place the turkey, backside down, in a roasting pan fitted with a rack
. Place the bunch of sage inside the cavity, as the herbs will release their aroma into the meat as it roasts. Let the turkey sit at room temperature for 2 hours prior to being cooked. This will let the turkey warm up, allowing it to cook more evenly. Discard the brine, as it has done its purpose and not safe to re-use.
Under the Skin Preparation:
- With the beer brine, the turkey is fine to cook, once it is dried. To add extra flavor and decoration for when the turkey is served, you can dress up the turkey with some flavor bling. Using your fingertips, start at the neck and slide one finger inside the neck skin and start separating the skin from the meat. Gradually add a second finger to finally your whole hand (that is pressed flat against the breast meat), being very careful not to force, but separate the skin from the meat, as the skin can tear. Repeat this same process with the other breast. Once this is done, move to the open cavity, and on one side of the turkey start separating the skin from the leg/thigh, working around the thigh to the leg. Repeat this process for the other leg.
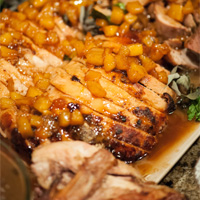
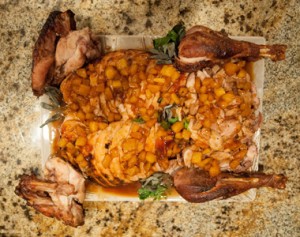
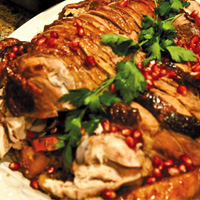
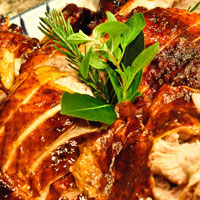
- Now that the skin is loose, the turkey can be stuffed with herbs, rubs, or bacon to add additional flavor to the turkey. And when the turkey cooks, the skin will display the garnish, creating a beautifully finished bird.
- Herbs: Try using a mix of fresh herbs like thyme, bay leaves, rosemary, marjoram, and | or oregano. Arrange the herbs in a pattern under the skin on each breast. Copy the pattern to the opposite breast to give the finish turkey symmetry when being presented. Use herbs to wrap around the legs and thighs too, creating a unique pattern with what herbs you have. A good tip is to start at the farthest part from you and work towards where you are stuffing from.
- Bacon: cured, smoked and sliced pork belly is another great option, as the fat of the bacon renders as the turkey cooks, adding another layer of protection from the breast meat drying out. I like to use thick-cut bacon, that has been smoked. Arrange the strips of bacon alongside the chest bone and but each strip right next to the last, working your way down the breast. Cut the bacon if it is too long with kitchen sears to fit. Then repeat on the opposite side of the turkey. For the leg/thighs, wrap the bacon around the legs, then continue with the thighs, creating a pinwheel effect. Press the skin down to remove any air pockets and help secure the bacon from sliding.
- Rubs: Since the turkey has been brined, seasoning the bird from the inside out, additional flavors should be just that, herbs and spices, not salts. If you have a favorite rub, check to see how much salt is used. Many commercial rubs use a lot of salt as a filler, as it is cheaper than the herbs and spices. Sprinkle the rub mix under the skin, creating an even coating on each side. Mixing the rub with some olive oil or room temperature unsalted butter to create a flavor paste can also be done, again giving the breast meat additional fat to help keep the meat moist and juicy as it cooks.
Over the Skin Preparation:
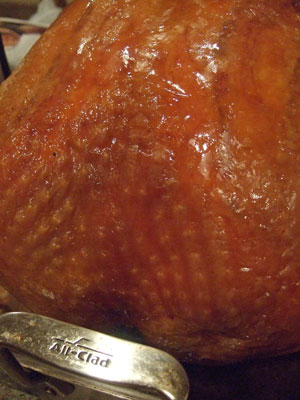
- Remember that the turkey has been seasoned with the brine. Once the skin has been dried thoroughly, you can brush/rub oil (such as olive oil or vegetable oil) all over the skin to help create a wonderfully crisp skin, or use room temperature unsalted butter to create a light coat of fat. Very lightly season the skin with salt and pepper if you wish.
- A rub can also be used to create multiple flavors. A Cajun spice rub, fresh herb rub, or jerk spice can be used to give the turkey a culinary field trip. Be careful of the salt content of the rub, if you are using a commercially made rub, as salt is cheaper than herbs and spices.
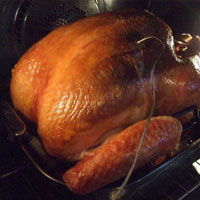
Oven Roasting Directions:
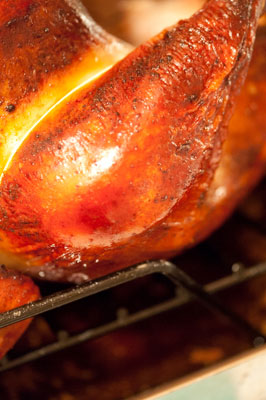
- Pre-heat the oven to 350°F | 177°C, convection roast/bake if this setting is an option. Truss the bird with twine, to help hold its shape and to aid in cooking the turkey evenly. I highly recommend using a probe thermometer
to make sure the turkey is cooked to a certain temperature (160°F | 71°C) verses a length of time. Insert the probe into the middle of a breast or in one of the thighs. Make sure the tip of the probe isn’t touching a bone, as the temperature reading could be false.
- If you don’t have a probe thermometer, a 16 – 20 pound turkey should take between 3 and 3 1/2 hours to fully cook to 160°F | 71°C. Check both the breast and the thigh temperature to make sure the turkey is evenly cooked. Other recipes describe cooking a turkey until the internal temperature reaches 180°F | 82°C and this is one reason for a dry turkey.
- Turkey is safe to eat after it reaches 165°F | 74°C. It’s fine to remove the turkey from the oven at 160°F | 71°C, as the heat of the oven and the surface temperature is higher than the internal temperature. As the turkey rests, the carryover heat will finish cooking the turkey and bring it to a safe final cooking temperature of 165°F | 74°C.
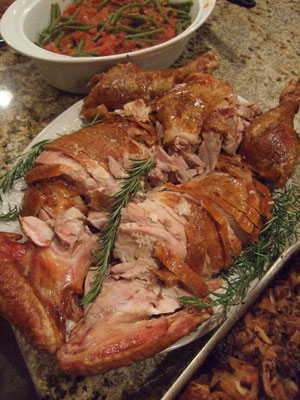
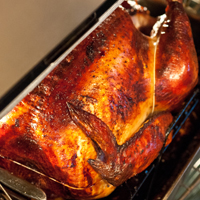
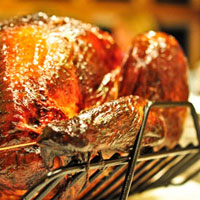
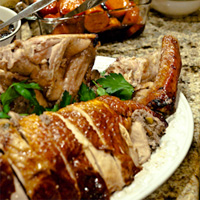
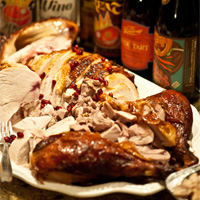
- Let the turkey rest at room temperature for 20 – 30 minutes before carving. This is critical in keeping a moist and juicy turkey. This resting will relax the muscle fibers, helping re-distribute the juices and allow the bird to be easier to handle when carving. Cover the turkey with a large sheet of aluminum foil.
Recipe Notes
Cooking Beer Suggestions:
With turkey meat much like it’s fowl cousin chicken, there isn’t a ton of unique flavor; it’s very subtle. I have found that using beers that use a good percentage of melanodin malts add a rich flavor to the turkey, enhancing the maillard reaction that occurs during the cooking process. Beer styles like German Bocks, Doppelbocks, American Brown Ales, English Brown Ales, Dunkelweizen, Vienna Lagers, Roggenbier, Scotch Ale/Wee Heavy, Irish Red Ale and Märzens/Oktoberfest all compliment the flavors of turkey with this beer brine recipe. Below are some other beer style and brewery versions, each adapting the beer brine to fully utilize the beers nuances in flavoring the turkey.
More Beer Brined Turkey Recipes and Cooking Techniques:
BBQed Beer Brined Turkey
Deep Fried Beer Brined Turkey

Grilled Beer Brined Turkey
Oven Roasted Beer Brined Turkey
Smoked Beer Brined Turkey
Sous Vide Beer Brined Turkey
Alternative Beer Brined Turkey Recipes:
Allagash Tripel and Tangerine Beer Brined Turkey
Beer Brined Turkey
Dawn of the Red Polynesian Inspired Beer Brined Turkey

Dogfish Head - Indian Brown Ale Beer Brine Turkey

Firestone Walker Double Barrel Ale (DBA) Beer Brined Turkey
Hawaiian Pineapple Mana Wheat Beer Brined Turkey
Moroccan Style Beer Brined Turkey
Oaxacan-Style Beer Brine Turkey
Rogue Ales John John Juniper Pale Ale Beer Brine for Turkey
Sierra Nevada Tumbler Autumn Brown Beer Brine Turkey
South of the Border Style Beer Brined Turkey